Task Report
The Tasks Report page lets monitoring of the status of vairous diagnostic tasks initiated. It provides a quick overview of each task's performance, including its start and completion times, and a visual indication of its success.
Navigating to the task Report
-
Go to the Login > CE Device > [Select CE] > Diagnostic > Tasks Report.
Task-ReportAfter creating a new task, there is a 5-minute delay before the report appears on this screen. Checking the report immediately after task creation may not show results. Wait 5 minutes, then refresh the page to view the report.
Understanding the Tasks Report Table
The main table on the Tasks Report page provides detailed information for each diagnostic task. Here's a breakdown of each field:
| Field | Description |
|---|---|
| Task Name | The name assigned to the task when it was created. |
| Target IP / Domain | The specific IP address or domain name that the task is testing. |
| Ping | Shows the status of the ping test. A green check mark indicates a successful connection, while a red cross indicates a failure. |
| TCPPing | Showns the status of the TCP ping test. A green check mark indicates that the specified port is open and reachable, while a red cross indicated it is closed or unreachable. |
| HTTPPing | Shows the status of the HTTPPing test. A green check mark indicates that the HTTP port is responding, while a red cross indicates it is not. |
| Started | The exact date and time when the task began. |
| Completed | The exact date and time when the task finished. |
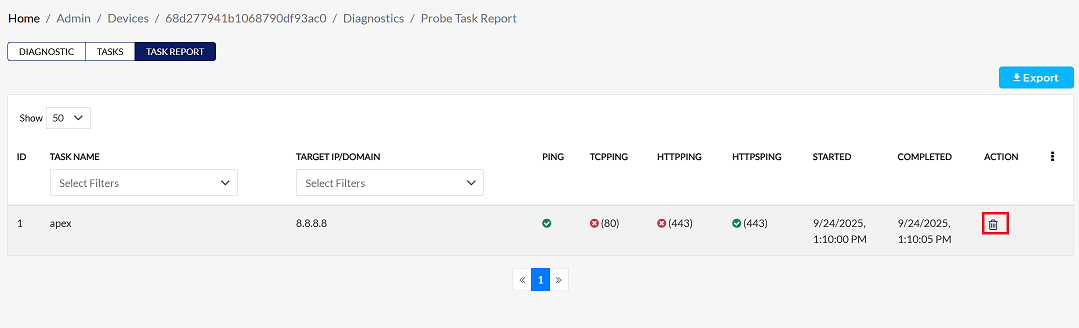
| Action | This column provides options to manage the task, including Delete the task. |
-
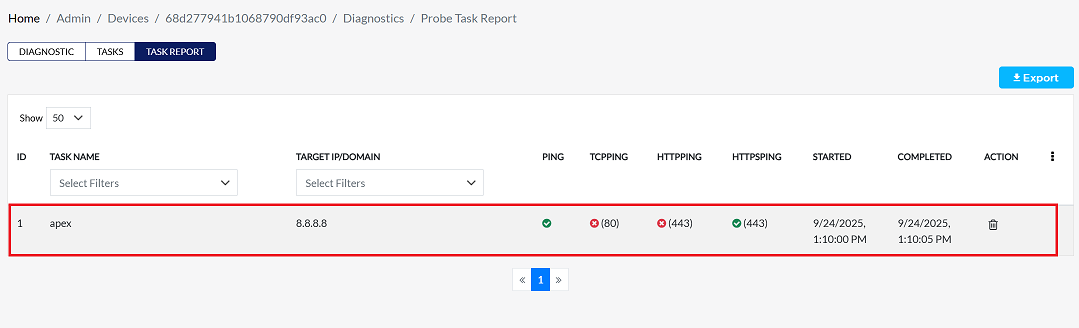
In the example below, diagnostic results are shown for the task named 'apex' targeting 8.8.8.8
- The Ping and HTTPSPING columns show a green check mark (✓), which means those tests were successful.
- The TCPPING and HTTPPING columns show a red cross (×), which means those tests failed.
Deleting a Task Report
-
To delete any Task Report, follow these steps:
-
Click on the Delete option in the 'Action' column in the row of the Task Report to be deleted.
-
By clicking on the Delete option, a confirmation message popup will open on the screen. This popup asks to confirm the deletion action again, which prevents accidental deletion.
- The task report has two options available:
- Confirm Delete: If the task report really wants to delete the information, click on the Yes button in the popup.
- Cancel Delete: If not intended to delete or clicked by mistake, click on the No button to cancel the action and keep the information safe.
- The task report has two options available:
-
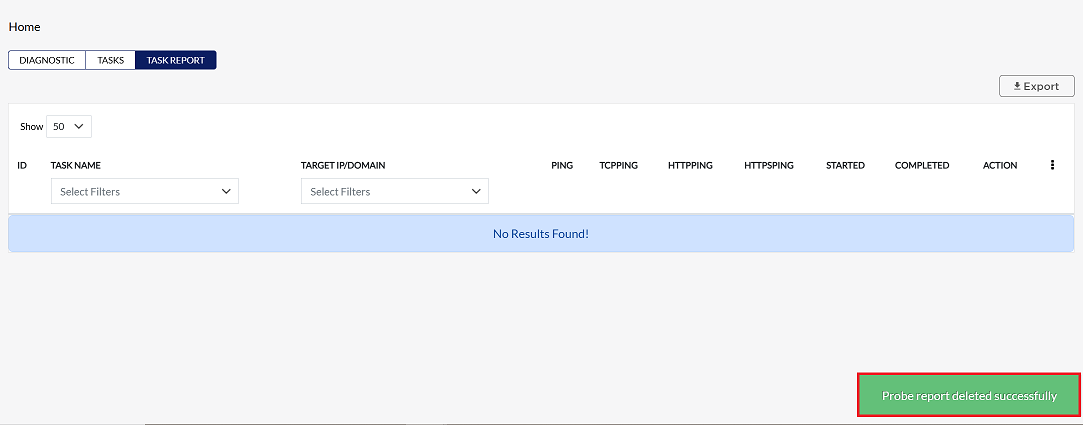
Decision taken in the image As mentioned, the Yes button has been clicked in the image. This means that the deletion action has been confirmed by the task report and the relevant data will be removed from the system.

-
Upon successful deletion, a message will confirm: Probe report deleted successfully.
Filtering the Tasks Report
The report provides filtering options based on Task Name or Target IP/Domain to help you quickly find specific results among a large number of reports.
Filtering by Task Name
-
Navigate to the Task Name column filter and click the dropdown.
-
Select the checkbox next to the desired task name (e.g.,
apex). The dropdown will show a count of how many reports exist for each name. -
Click Submit.

-
Only reports with the selected task name will be shown. The dropdown itself will also show a count of how many reports exist for each task name.

Filtering by Target IP/Domain
-
Navigate to the Target IP/Domain column filter and click the dropdown.
-
Select the checkbox next to the desired IP address or domain name (e.g.,
8.8.8.8). The dropdown will also show a count of how many reports exist for each IP/Domain. -
Click Submit.

-
Only reports with the selected IP or domain will be shown. The dropdown itself will also show a count of how many reports exist for each IP/Domain.

Important Notes for Users
- Newly created tasks may take up to 5 minutes to appear in the report.
- Deletion of a task is permanent and cannot be undone.
- Ensure the correct task is selected before confirming deletion to avoid accidental removal.
- Use filters to quickly locate specific tasks among a large number of reports.
- Only users with required permissions can delete tasks.
- Visual indicators (Green ✓ / Red ×) provide a quick success/failure check without opening the task details.
FAQs
Q:1 Which table fields show the time duration of a diagnostic task?
The Started field → Displays the exact date and time when the diagnostic task began. The Completed field → Displays the exact date and time when the diagnostic task finished. By comparing these two fields, you can determine the total time duration of the diagnostic task. This helps administrators understand how long each task took to execute and whether it completed within the expected timeframe.
Q:2 How do I delete a specific Task Report?
To delete a specific Task Report: Navigate to the Tasks Report page. Locate the task report you want to delete. Click the Delete option in the Action column of that task report row. A confirmation popup will appear: Yes (Confirm Delete) → Permanently deletes the task report. No (Cancel Delete) → Cancels the action and keeps the report. Once confirmed, the system will display the message: “Probe report deleted successfully”. This ensures that only intentional deletions are carried out, preventing accidental loss of diagnostic data.