DHCP Server
This guide explains how to configure a DHCP server for multiple LAN interfaces, enabling automatic IP address assignment to devices connected to the same network. It includes easy-to-follow steps to set up and test the configuration.
Overview
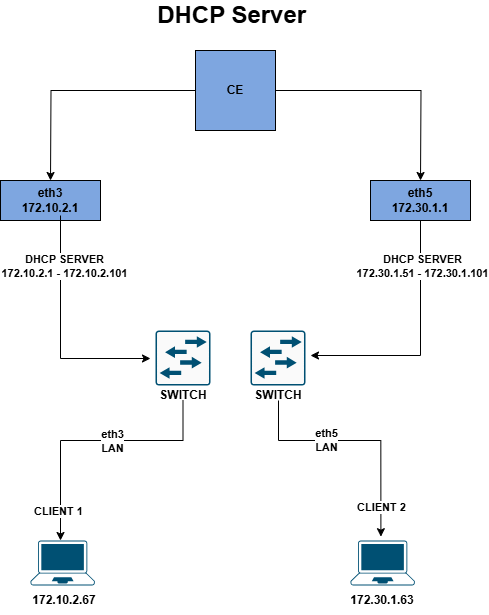
A DHCP server automatically assigns IP addresses to devices in a network, simplifying network management. By configuring a DHCP server on the LAN interface, client devices can automatically connect to the network without manually setting IP addresses.
Important Prerequisite:
Before starting the DHCP server, you need to make sure that your chosen network connection (such as a LAN) has been assigned a specific IP address. See the document titled How to Configure Static for information on how to set a specific IP on this connection. This specific IP address will act as a gateway for computers on that network.
Enable DHCP Server and Configure New Range
Edit the LAN Interface
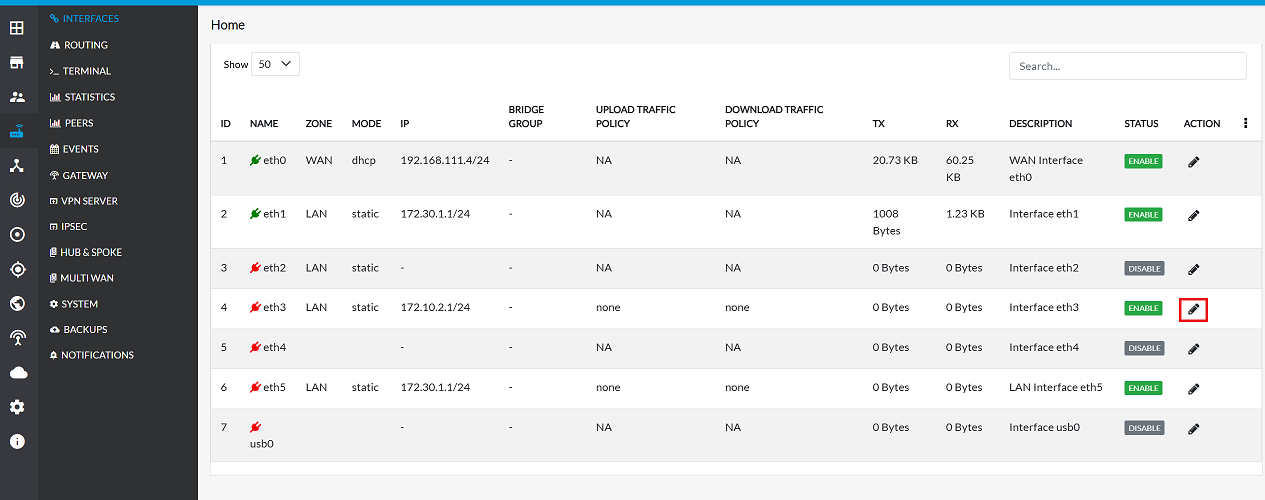
The first step is to access the configuration details for the existing LAN interface.
-
Click on the Edit button corresponding to the LAN interface.
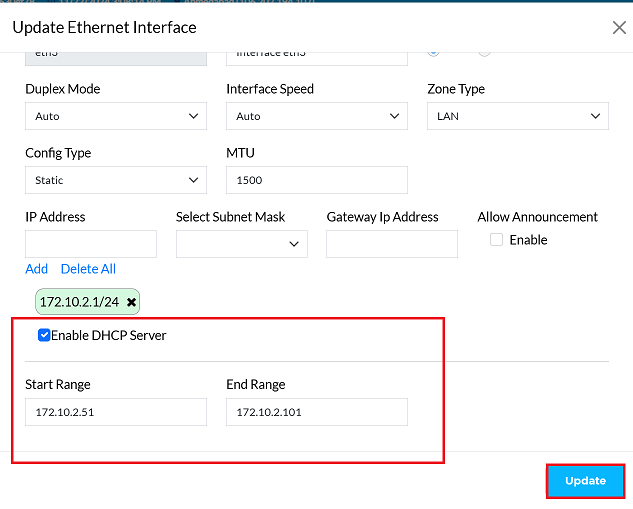
Enable DHCP and Configure Range
In this section, the DHCP service is activated and the pool of IP addresses that client devices automatically receive is defined.
-
Enable DHCP: Check the DHCP Server option.
-
This action turns on the service responsible for automated IP address assignment.
-
Set IP Range: This defines the scope of addresses that the server can lease to connected devices.
- Enter the Start Range (e.g., 172.10.2.51). This is the first available IP address in the dynamic pool.
- Enter the End Range (e.g., 172.10.2.101). This is the last available IP address in the dynamic pool.
-
Once the settings are configured, click on the Update button.
-
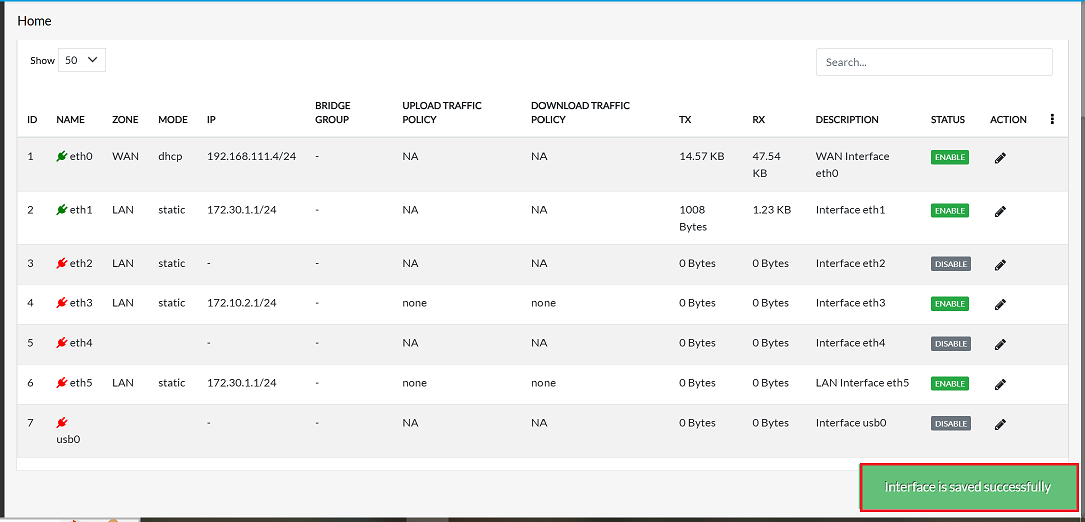
Upon clicking update, a confirmation message, Interface is saved successfully will appear on the screen.
Client PC Configuration
- To ensure the DHCP server is working as expected:
- Connect client PCs to the configured LAN ports.
- Verify that:
- The client receives an IP address within the configured DHCP range (e.g., 172.10.2.51 to 172.10.2.101).
- Internet connectivity and Default Gateway (CGW) settings are functional.
- Use the
ipconfigorifconfigcommand on the client PC to view the assigned IP address and gateway.
Important Notes for Users
- Ensure no IP conflicts exist between the DHCP range and static IPs on the network.
- Always verify the start and end IP range to accommodate the number of client devices.
- Shorten DHCP lease times for dynamic networks with frequent device changes.
- If using multiple LAN interfaces, configure separate DHCP ranges for each to avoid overlaps.
- Confirm the gateway IP is correctly assigned; incorrect gateway configuration may prevent internet access.
- Only authorized users should modify DHCP settings to prevent network disruption.
FAQ
Q:1 What is the main purpose of a DHCP server?
A DHCP server automatically assigns IP addresses, subnet masks, gateways, and DNS settings to client devices, eliminating the need for manual configuration.
Q:2 What happens if the DHCP pool runs out of IP addresses?
New devices will fail to obtain an IP address. To fix this, expand the DHCP range or reduce lease times so unused IPs are recycled faster.
Q:3 How can I view the DHCP lease table for active clients?
Navigate to the DHCP Lease Table section in the CE device interface. It displays details such as IP address, MAC address, hostname, and lease expiry time for connected clients. This information is available only on the CE LoUI and cannot be viewed on the platform.