VPN Client
The VPN Client allows secure and private network connections for users accessing remote resources. This guide provides a comprehensive step-by-step process for installing the VPN Client application on different operating systems, connecting to a VPN server, managing user profiles, and troubleshooting common issues. The guide is divided into sections covering installation for Windows, connecting to the VPN, disconnecting, deleting profiles, and frequently asked questions (FAQs).
Installing the VPN Client Application
-
Windows Client ApplicationInstallation
Step 1: Application Download
- Download the hiclouds.exe application from the official source.
application-install-for-linux-and-ubuntu
Download the hiclouds.rpm version For Linux Users. and download the hiclouds.deb version for Ubuntu users.
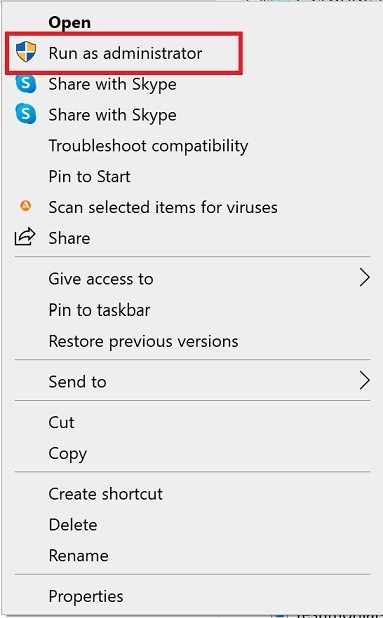
Step 2: Execute as Administrator
-
Right-click the hiclouds.exe file and select Run as administrator to start the installation process.
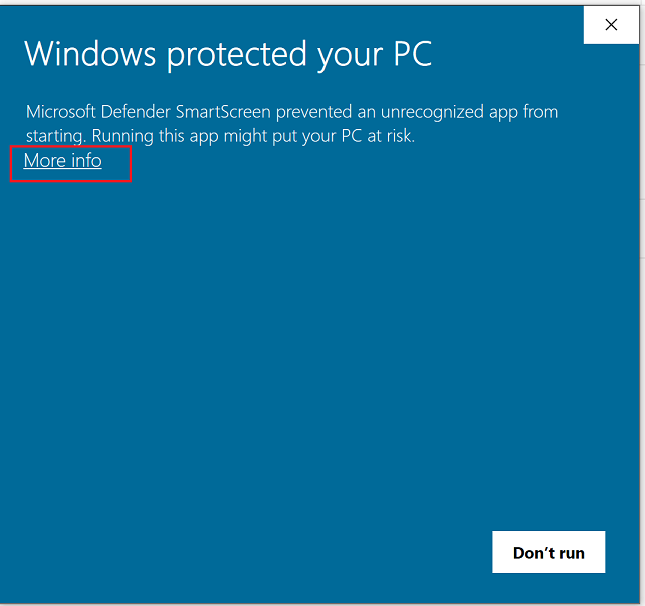
Step 3: Bypass Security Warning
-
When prompted with a security warning, click More Info to view additional options.
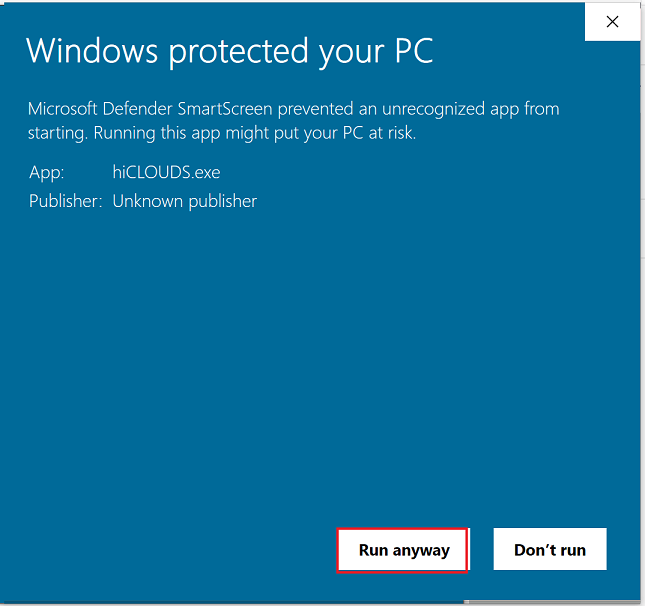
Step 4: Confirm to Run
-
Select the Run anyway option to proceed with the installation despite the warning.
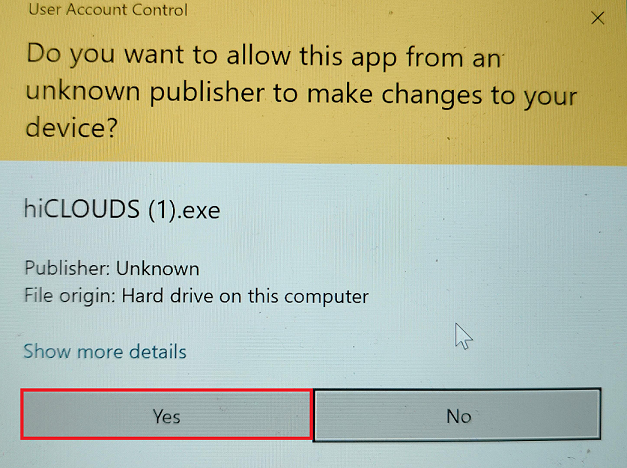
Step 5: Administrative Approval
-
Select Yes in the User Account Control dialog to continue the installation.
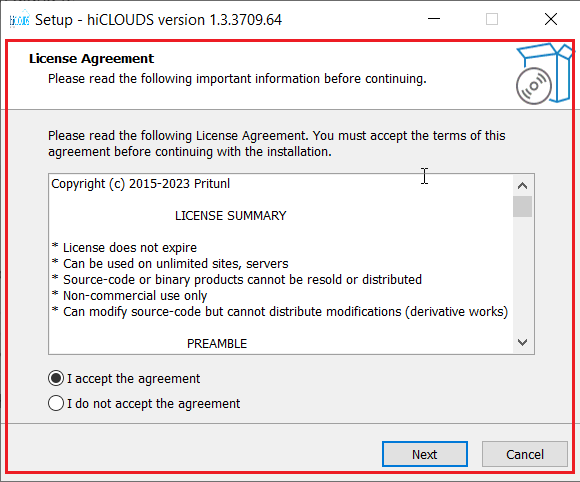
Step 6: Accept License Agreement
-
Review the license agreement, check I accept the agreement, and click Next to continue.
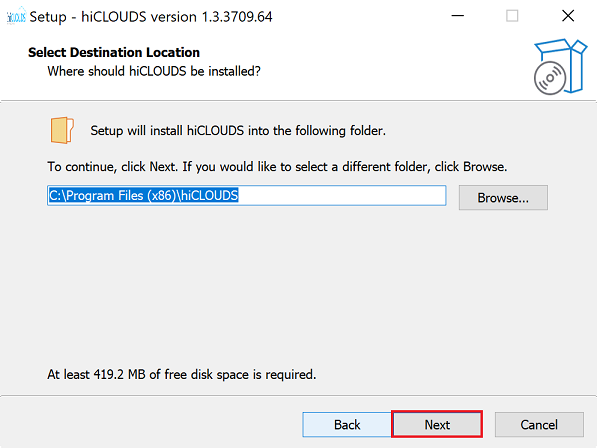
Step 7: Define Installation Path
-
Confirm the default installation path or select a different one, then click Next button.
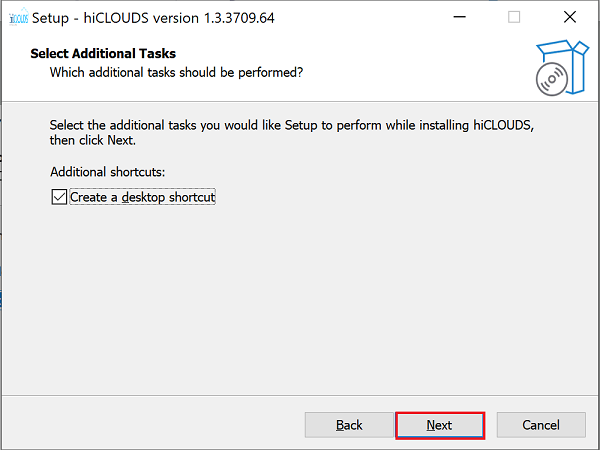
Step 8: Advance Installation Steps
-
Continue by clicking Next on the subsequent screen.
Step 9: Initiate Installation
-
Click Install to begin the application installation process.

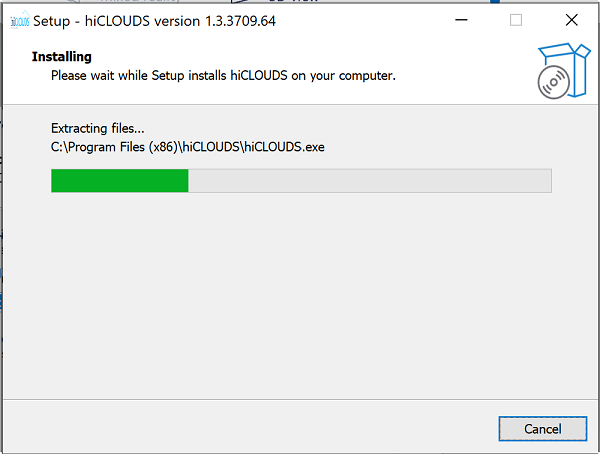
Step 10: Monitor Installation Progress
-
The installation progress will be visible, showing real-time updates.
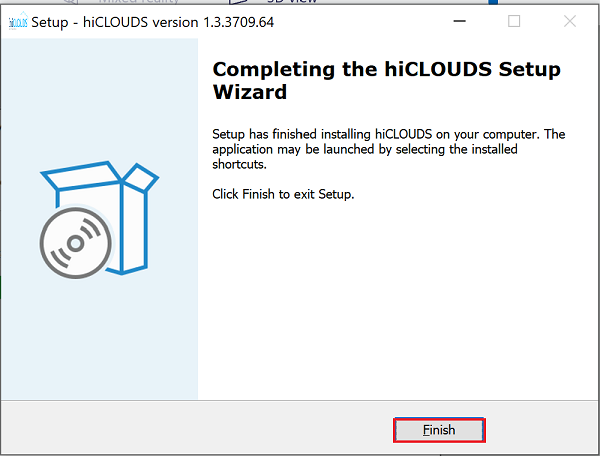
Step 11: Complete Installation
-
Once the installation is complete, finish the process by clicking the Finish button.
-
Ubuntu Client Application Installation
Step 1: Application Download
- Download the hiclouds.deb application from the official source.
Install the Application
Step 2: Open Terminal:
- Press Ctrl + Alt + T to open the terminal.
Step 3: Navigate to the Download Directory:
- Use the cd command to navigate to the directory where you have downloaded the hiclouds.deb file. For example:
cd ~/Downloads
Step 4: Install Dependencies:
- Before installing the VPN client, ensure you have the required dependencies. Update the system packages and install any missing dependencies using the following commands:
   sudo apt update
   sudo apt install -f
Step 5: Install the VPN Client:
- Run the following command to install the hiclouds.deb package:
sudo dpkg -i hiclouds.deb - If you encounter any dependency errors, run the following command to fix them:
sudo apt-get install -f
Step 6: Verify Installation:
-
After the installation is complete, verify that the VPN client has been installed correctly by running:
hiclouds --version -
Linux Client Application Installation
Step 1: Application Download
- Download the hiclouds.rpm application from the official source.
Install the Application
Step 2: Open Terminal:
- Press Ctrl + Alt + T to open the terminal.
Step 3: Navigate to the Download Directory:
- Use the cd command to navigate to the directory where you have downloaded the hiclouds.rpm file. For example:
cd ~/Downloads
Step 4: Install Dependencies:
- Ensure your system is updated and required dependencies are installed. Run the following commands:
   sudo dnf update
   sudo dnf install -y libXScrnSaver
Step 5: Install the VPN Client:
-Use the following command to install the hiclouds.rpm package
sudo rpm -i hiclouds.rpm
- Alternatively, you can use dnf for installation (recommended for handling dependencies):
sudo dnf install hiclouds.rpm
Step 6: Verify Installation:
- After the installation is complete, verify that the VPN client has been installed correctly by running:
hiclouds --version
VPN Client Connection Setup
Step 1: VPN Client Profile Creation
- Reference the file Create VPN Cliente Profile to create a VPN client profile as per your requirements.
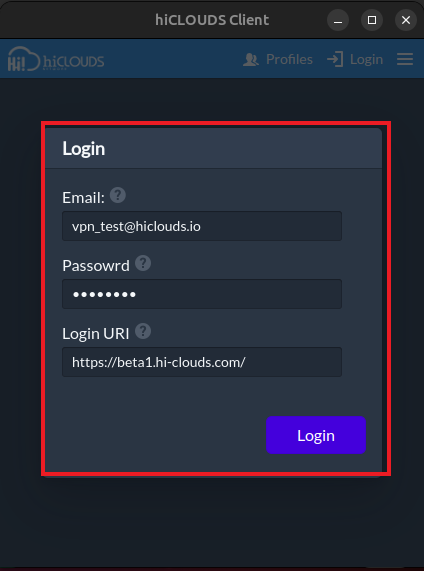
Step 2: Input Login Credentials
- Email:- Enter the email used while creating vpn user.
- Password:- Enter the password entered while creating vpn user here.
- login url:- Here the url of the user's cloud platform will come.
Authenticate User
-
Click the Login button to authenticate and access the VPN server.
Step 3: Profile Import Confirmation
-
Upon successful login, a message will confirm the profile import and VPN connection. Click the Connect button to establish the VPN connection.
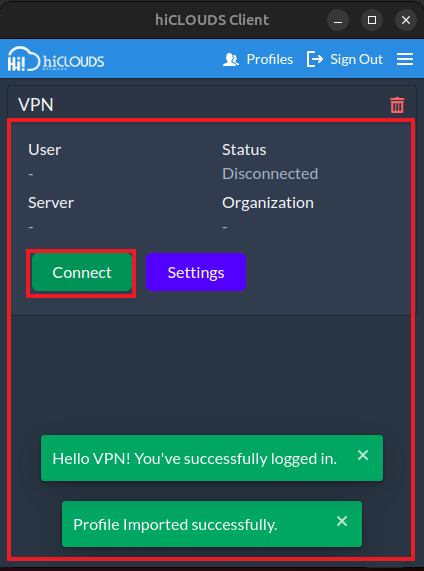
Step 4: Verify Connection Status
-
On Connection it will show Online for 5 Sec in the status.

Step 5: Confirm VPN Server Connection
-
The VPN client interface will display the connected status, confirming that the VPN server connection is active.
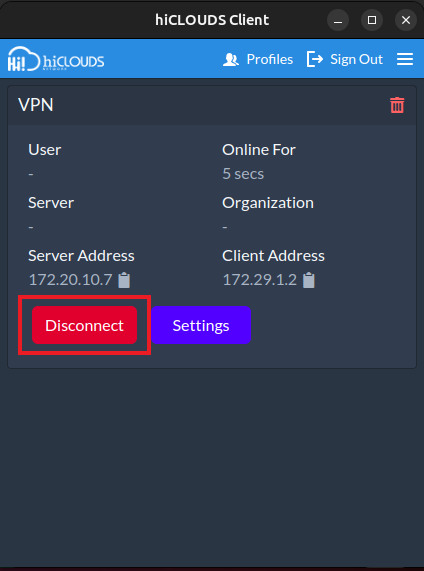
Disconnecting from VPN Client
-
Select the Disconnect button to terminate the current VPN connection.
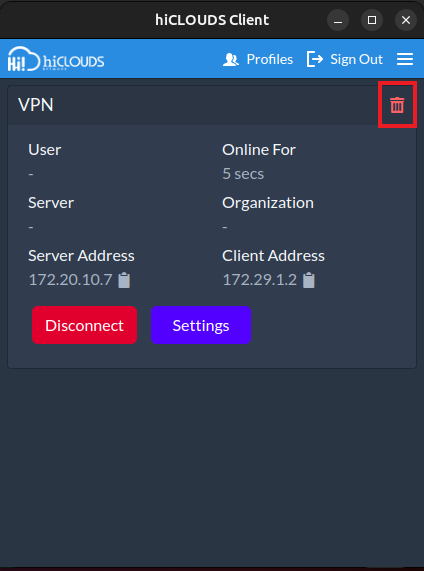
Delete VPN Client Profile
Step 1: Initiate Profile Deletion
-
Click on the Delete icon next to the profile that needs to be removed.
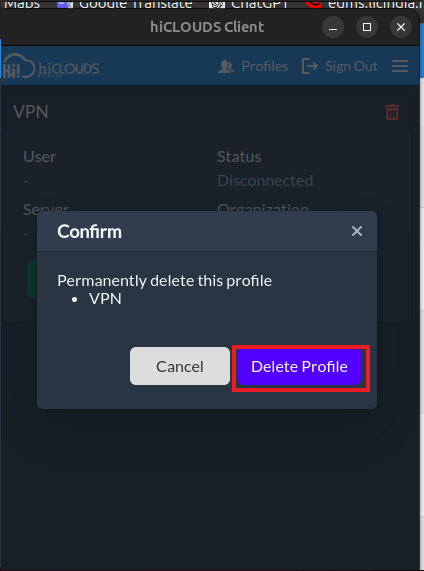
Step 2: Confirm Profile Removal
-
A confirmation dialog will appear Click the Delete Profile button to finalize the deletion.
Important Notes for Users
- Administrator Rights Required:- Windows users must run the installer as Run as administrator.
- Download Only from Trusted Source:- Always use the official platform link to avoid security risks.
- Profile Creation Required:- VPN connection will only work after a valid VPN Client Profile is created.
- Correct Login Details Needed:- Enter the same email & password used while creating the VPN user.
- Stable Internet Required:- Ensure your system is connected to the internet before logging in or connecting.
- Single Active Connection:- Avoid connecting the VPN on multiple devices using the same account simultaneously.
- Use Disconnect Option Before Exit:- Always click Disconnect before closing the VPN client.
- Profile Deletion is Permanent:- Once deleted, the profile must be re-created from the Cloud Platform.
- Permission Controlled Feature:- Access depends on your role and permissions assigned by the administrator.
- Security Best Practice:- Do not share your credentials or VPN configuration with others.
FAQ
Q-1: What should I do if the application fails to install?
Ensure all required dependencies are installed (for example, use apt install -f on Ubuntu-based Linux distributions).
Q-2: What is a VPN client and why should I use one?
A VPN client is software that establishes a secure, encrypted connection between your device and a remote VPN server. Benefits include: Protecting sensitive data from interception. Ensuring privacy when accessing remote resources. Allowing secure access to internal networks from external locations. Bypassing geo-restrictions and enhancing compliance with security policies.
Q-3: What is the process for updating the VPN Client application?
Visit the official source to download the updated installer for your operating system. Run the installer with administrator/root privileges. Follow the installation wizard or terminal commands (depending on the OS). Restart the application and confirm the version update.
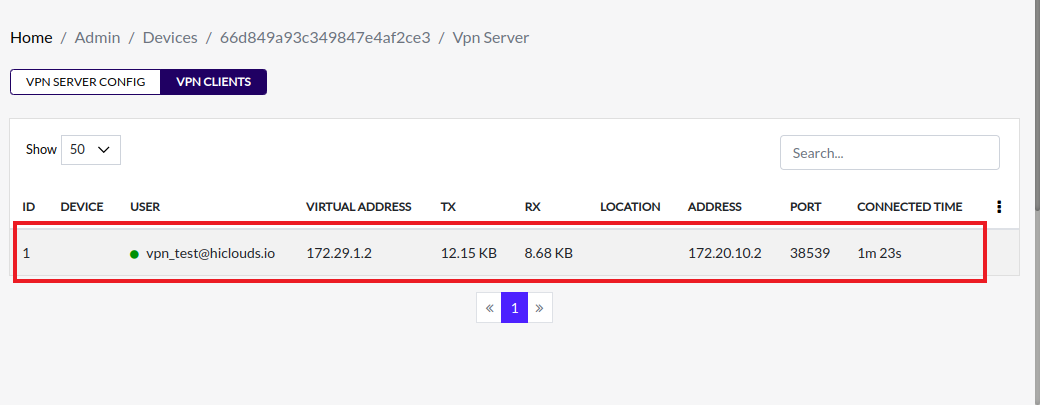
Q-4: How can I view detailed connection logs?
Open the VPN client application interface and click on the menu button in the top-right corner. From the menu, select View Logs. Inside the logs section, you will find three types different log views, which allow you to review all connection-related logs in detail.